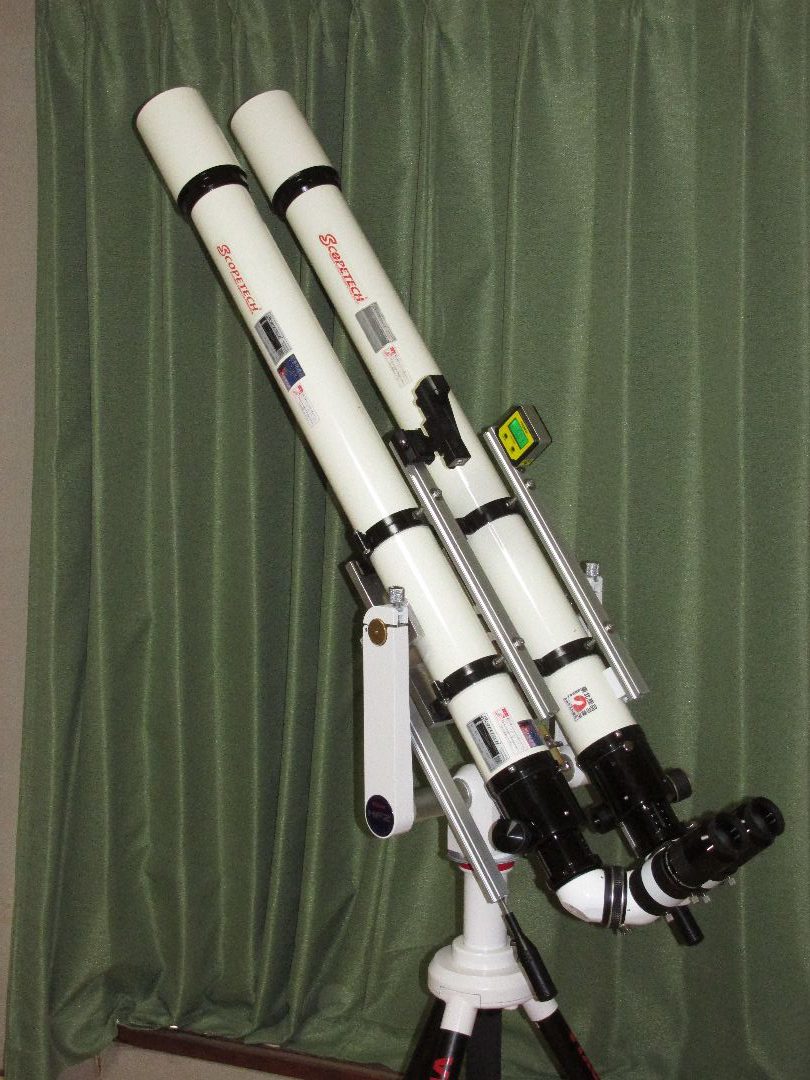


STL80A-MAXI鏡筒(口径80mm、焦点距離1,200mm)に適合する2インチ接眼部2個を格安で購入できる機会があり、その時保有のSTL80A-MAXI鏡筒にもう1本追加購入して双眼望遠鏡にしたくなり作成しました。
HF2経緯台にのせる双眼望遠鏡ユニットとしてはバランスウエイトが付いた状態で11.1kgの重量になりました。10kgオーバーとなり少し重たい感じですが、それよりも長さが125cm程度と長いので、HF2経緯台へ載せたり、降ろしたりや運搬にはぶつけやすく注意が必要です。
また双眼望遠鏡ユニットとしては細身なので自立で立てておくのは不安定で、横にするか、ストッパーをつけてたてかけるなどの転倒防止措置が必要です。
HF2経緯台も以前から紹介と同じく複数台所有のHF2経緯台の使いまわしです。
アクロマートですが長焦点でもあり、気持ち良く見える感じです。明るい星を高倍率で見ると色収差を感じますが、6mm接眼鏡使用の200倍でも十分使える感じです。
長焦点鏡筒ですが2インチ50mmの接眼鏡で24倍の低倍率が得られます。2インチ26mmの広角、ハイアイレリーフの接眼鏡では46倍となり散開星団など迫力が増して見やすいです。このくらいの倍率になるとトラペジウムも分離して見えるようになり気持ち良いです。通常は裸眼で使用していますが眼鏡使用でも使えて快適です。
以下、詳細について追加説明します。
(1) スコープテック STL80A-MAXI鏡筒はオリジナルでは31.7mm接眼部なので「EMS-ULセット+IPDヘリコイド」使用には2インチ接眼部への交換が必要で、交換しました。
今回交換した2インチ接眼部に対して、鏡筒を95mmカットして、バックフォーカス198mmとしました。絞りの位置が奥まっていたので、95mmカットしても影響はありませんでした。
また今回の接眼部のストロークも80mmあるので十分です。繰り出し33mm程度で無限遠合焦します。
(2) 鏡筒間隔D=160mmとしました。
双眼望遠鏡ユニットの構造としては、これまで4台作成したものとほぼ同じです。
耳軸の位置は鏡筒径の中心にしました。今回もほぼこれで天頂付近の垂直時のバランスがとれているようです。軽い31.7mm接眼鏡を用いると若干ズレる感じもしますが、HF2経緯台のクランプの摩擦を若干増加させることににより対応可能範囲です。
(3) 当初、EMSの上下方向が調節範囲に入らなかったので片側に1.0mm厚のワッシャーを入れて、調節範囲内としていましたが、使用しているうちに原因不明で範囲外になったので、現在は調節用ワッシャーを外して調節範囲内として使用しています。
加工精度などだけで、EMS調節範囲に入れられているのは尊敬します。私の自作能力では無理と思われます。
(4) これまでと同様に31.7mm接眼鏡と2インチ接眼鏡交換時の前後バランス調節用の約1kgの調節移動可能のバランスウエイトを取り付けています。
バランスウエイトを脱着する必要はなくスライドで対処できるので操作性が良いです。
所有工具の加工能力からバランス用ウエイトは55mm径黄銅丸棒として12.5mm径の12mm径ウエイト用の軸穴を開けています。クランプネジを含めて1,040gになりました。ウエイト軸は12mm径アルミ丸棒です。
所有ボール盤のチャックの最大は13mmなので、12.5mm径の穴あけは限界に近いです。黄銅丸棒への12.5mm径ドリリングは最後の少し貫通したところでドリルが噛み込みうまく穴あけできなかったので、反対側から筍ドリルで穴を大きく追加工して対処しました。
ウエイト軸は12mm径アルミ丸棒なので、脱落防止ねじ取付用のM5の穴を両端に開けています。12mm径に対してM5用の4.2mm穴を開けるので、多少加工誤差があっても大丈夫です。
本来は、クランプネジによる傷の対応などではステンレス棒が良いのでしょうが、1kg程度のウエイトにはアルミでも十分な感じです。
(5) 自宅ベランダからの手軽観望の時には、ベランダが120cm幅と狭いのでHF2経緯台のような中心に鏡筒を載せるタイプが最大限にベランダスペースを有効に活用できて便利です。
T型経緯台だと回転半径が大きくなり、鏡筒の短い機種でないとスペース不足になり易いです。
HF2経緯台もフォークを90度として垂直にすると更に使いやすくなります。上空は上階のひさしにより見えないので必要ないです。今回のSTL80A-MAXI双眼では高度60度まで可能です。
また、ベランダ手すり高さは約130cm~135cmなので、HF2経緯台の耳軸位置も約130cmの高さでの運用としています。地平線に近い低空の対象物のときは高さ30cm程度の踏み台を用いて上から覗き込む姿勢となります。
ドブソニアンは耳軸位置が低いので、台の上などに載せないと、手すりを超えての視野確保が難しくなります。
(6) 操作棒は2本のストレートにしています。ストレートタイプで、両手で操作は私の好みでもあります。
(7) 接眼部は2インチ寸法がEMSとギリギリのようで、EMS取付を慎重に回転しながら行わないと挿入できませんでした。いったん挿入できるとガタなどほとんどなく快適です。
接眼部の回転機構のクランプが弱いせいか、EMSを回転させようとしたときに接眼部が回転してしまうことがあります。
(8) 接眼部のクレフォードは、あまり重量物には対応できていないもののようですが、調整でEMSと2インチ接眼鏡でも一応使えています。
(9) 今回、スコープテック STL80A-MAXI鏡筒はバックフォーカス延長のために鏡筒カットを前提にしており、オリジナルでは接眼部近くの鏡筒に品名ラベルが貼られていることから、販売店のスコープタウンに依頼して品名ラベルを貼らずに、添付してもらい、当方で好みの位置に貼り付ける対応としました。
既所有のSTL80A-MAXI鏡筒では、熱湯につけて品名ラベルの剥がしを試したところ、運良く破損せずに剥がせたので、接着剤で鏡筒前方位置に貼りなおしました。
(10) 追加購入したSTL80A-MAXI鏡筒で鏡筒カット時に切断位置目印に全周にわたって電工ビニールテープを貼り付けたが、剥がしたときに塗装が弱い部分があったらしく、塗装が剥がれた箇所が発生しました。軽微で性能にも影響しないのでそのままにしています。
(11) 追加購入したSTL80A-MAXI鏡筒では照準パーツが取り付けられた仕様に改良が行われていたが今回必要ないので取り外しました。ネジ穴は黒色のビニールテープで穴をカバーして塞いでいます。
(12) 既所有STL80A-MAXI鏡筒ではファインダー取付アリ溝を取り付ける改造をしており、活用できる可能性もありそうだったのでそのまま右側鏡筒として使用しています。
Comment by Matsumoto / 管理者のコメント
YNさん、5台目のBINOの完成、おめでとうございます!
昨今では大変珍しい、長焦点(F15)のBINOへのご挑戦に敬意を表します。
私が天文や望遠鏡に興味を持ち始めた頃(50年ほど前^^;)は、屈折望遠鏡の標準のF値は15で、それより短い物は、低倍用に特化した特殊なスペックだと認識されていました。久しぶりに当時の標準スペックの鏡筒を見ると、随分と長く感じます。
長い鏡筒なりの困難があったようですが、見事に克服されました。
また、6台目のBINOを楽しみにしています。
ありがとうございました。