
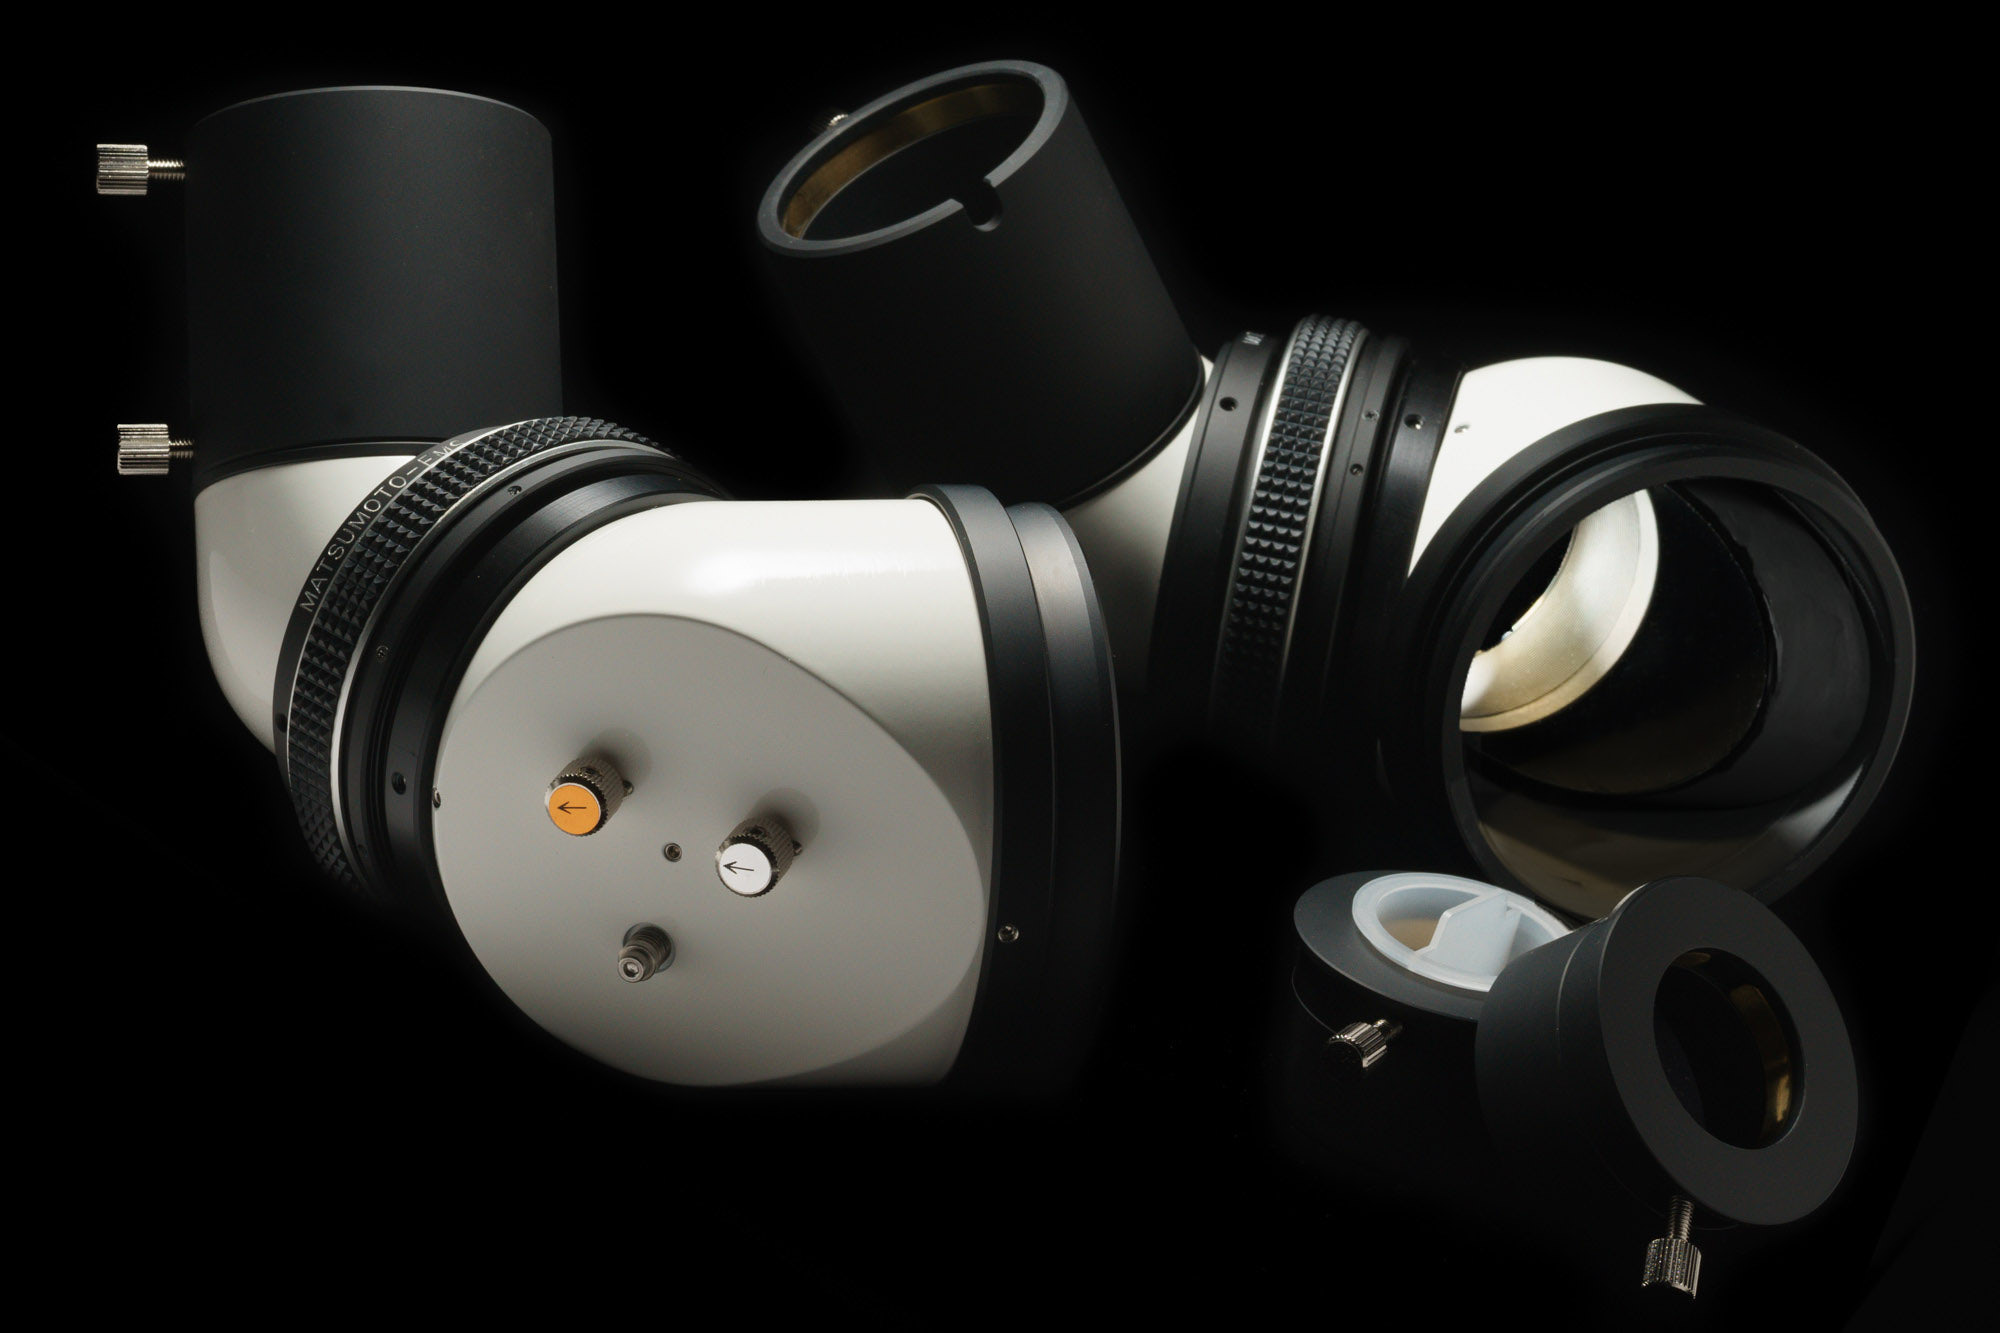
Another lot of EMS Housings is ready to be painted.
Innovation of Astronomical Telescope
正立ミラーシステム(EMS)を開発した松本龍郎のサイト。 たった2回の反射で天体望遠鏡の像を正立像にします。
Tatsuro Matsumoto; Inventor of the EMS, Erecting Mirror System. EMS offers non reversed upright image with no additional undesirable abberations.
Another lot of EMS Housings is ready to be painted.
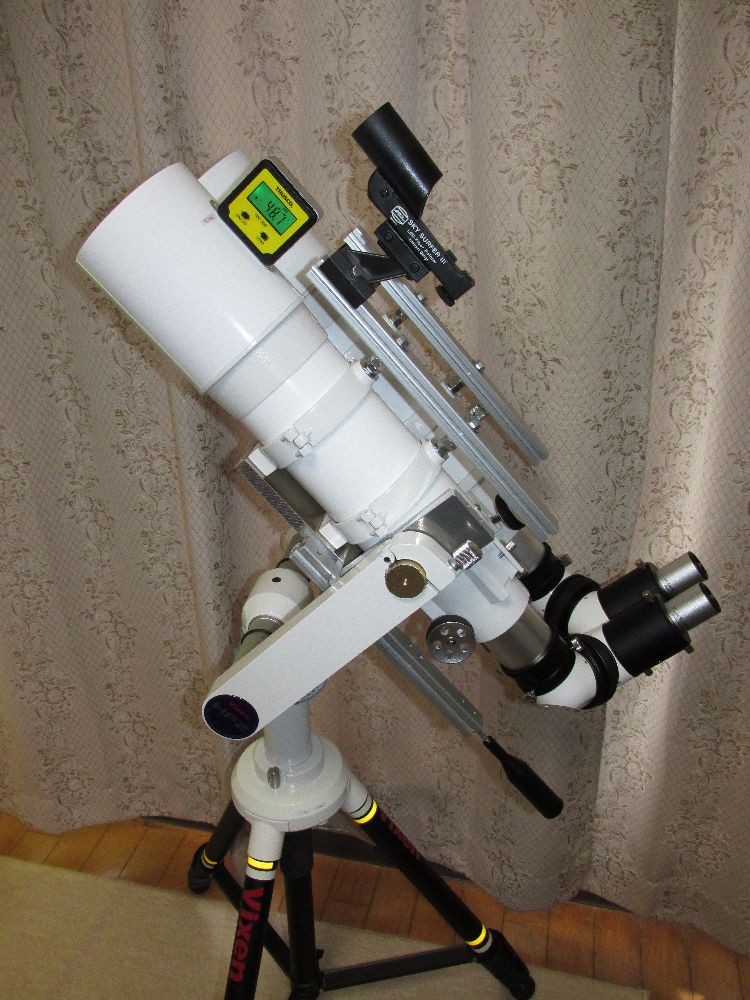


御社の「EMS-ULセット+IPDヘリコイド」とケンコーのSE-102鏡筒にエクステンダーレンズを組み込んだ自作の双眼望遠鏡を作成しましたので紹介の写真を送付します。
これで「EMS-ULセット+IPDヘリコイド」使用の双眼望遠鏡は4台目になりました。
尚、「EMS-ULセット+IPDヘリコイド」は使い回しです。
先に紹介のSE-120鏡筒(F5、焦点距離600mm)でのエクステンダーレンズを組み込んだ自作の双眼望遠鏡をSE-102鏡筒(F4.9、焦点距離500mm)に展開したものです。SE-102鏡筒を持っていたのでこちらではどのようになるのか興味があり作成してみました。
EMSは使い回しで対応しています。汎用性の高い2インチ取り付けの「EMS-ULセット+IPDヘリコイド」にしておくと、興味を持った双眼望遠鏡を自作して試したいときにコストや保管スペースなどで便利です。
SE-120鏡筒使用のときと同様にSE-102鏡筒のF4.9の短焦点のアクロマートにエクステンダーレンズを追加した方式で、収差を好まない人もいると思いますが、それなりには見えているので実用範囲と思います。エクステンダー無しに比べても悪化した印象はありませんが、収差増大による解像度の低下はあるようで中倍率までの使用になると思います。
また、同じくエクステンダーレンズにはステレオ顕微鏡用の補助対物レンズ0.75Xを転用して、更に対物側がレンズ凸面、接眼側がレンズ凹面になるように逆方向にして組み込みました。
HF2経緯台にのせる双眼望遠鏡ユニットとしては9.9kgの重量になりました。
SE-120双眼望遠鏡よりさらに軽くなり扱いやすいです。また既設接眼部を使用できるのでコストアップが少ないです。ただし、小さくなっても、EMSやバランスウエイト重量、経緯台への取り付け部品は大きさはほとんど変わらないので、それほど軽量になるわけではありませんが重量が10Kgを下まわり容易にHF2経緯台に載せたり降ろしたりできる感じです。
対物レンズが少し軽量になり前後バランス位置がほとんど接眼部近くの位置になったので鏡筒バンド位置が経緯台上下軸より前方になりました。
HF2経緯台も以前から紹介と同じHF2経緯台の使いまわしであり、天体の導入支援補助としてはGPS機能付きタブレットなどの星座アプリで目標天体のその時の方位と高度情報を入手して方位環とデジタル傾斜計を用いて導入します。1度以内程度の誤差範囲で導入でき
てそうな感じで便利です。もちろん等倍目視LEDドットファインダーで直接導入できる人はそのほうが速いです。
その時の気分で使用する鏡筒を選択して、HF2経緯台を使いまわして載せて楽しんでます。
それでも、HF2経緯台もアームを垂直に設定状態にしたものや45度に設定状態にしたもの、HF経緯台を含め複数台所有になっています。
以下、詳細について追加説明します。
(1) SE-102鏡筒のバックフォーカスは127mmで「EMS-ULセット+IPDヘリコイド」の光路長を確保しようとして鏡筒をカットすると大きく対物レンズ口径がケラレることになる。そこでエクステンダーレンズを組み込んで、バックフォーカスを長くして対応することにした。SE-120鏡筒と同じバックフォーカス量だった。
以前に紹介したSE-120鏡筒(F5、焦点距離600mm)エクステンダーレンズ版と同じ、エクステンダーレンズにステレオ顕微鏡用の対物補助レンズ0.75Xを使用しました。尚、私が入手したものは中国製で実売単価2,000円程度で対物補助レンズ0.75Xは2枚貼り合わせの凹レンズであった。レンズ径は39mm径。試用してみたところ、凸面を対物側にしたほうが見えが良かったので、対物側をレンズ凸面、接眼側をレンズ凹面として使用することにした。
SE-120鏡筒(F5、焦点距離600mm)エクステンダーレンズ版と同様にレンズセルの外形50mm径にビニールテープを巻きつけてドロチューブ内に押し込み、更にラックギアの手前側にM3イモネジで押し固定した。
光路としてはEMSの対物側にエクステンダーの凹レンズを入れた単純な構成です。一般のバローレンズのバローレンズ本体とアイピース間が長いタイプで、EMSの2インチスリーブの長さ30mmにEMS-UL+IPDヘリコイドの光路長最大180mm程度を足した最大210mm程度の長さになります。
(2) ドロチューブの繰り出し量でエクステンダーとしての倍率も変化し、ドロチューブの繰り出し量を除いた接眼部からのバックフォーカスも変化する。
バックフォーカスやエクステンダー倍率はSE-120鏡筒のときと同様程度と思われる。
通常の無限遠合焦もドロチューブ繰り出し量45mm程度となっている。
アイピースの瞳径を測って計算したところでは1.6倍程度のエクステンダーとしてはたらいているようです。従って500mmx1.6=800mm 程度の焦点距離になっているようです。
6mmアイピース使用時の133倍でも使える感じですが、木星の縞を見たところコントラストなどが低くなり見えづらくなり、この辺の倍率が実使用限界と思われ、低・中倍率での使用に割り切ったほうが良いと思います。
(3) エクステンダーにより焦点距離が800mm程度と長くなり、瞳径7mmの最低倍率15倍はほぼ実現できなくなりましたが、40mmアイピースで20倍、瞳径5.1mm、32mmアイピースで25倍、瞳径4.1mm、26mmアイピースで31倍、瞳径3.3mmであり私には十分です。
老人になっているので瞳径は5mm程度も開けられているかかどうか判りませんし、白内障手術での眼内レンズの直径は6mmとのことで、瞳径5mm対応できれば十分と思います。
蛇足ながら31.7mm規格アイピースで私がよく使用するのは、ケンコーのプロフィールド7×32双眼鏡の接眼部分を取り外して、31.7mmスリーブを取り付けた焦点距離18mm相当のアイピースです。今回だと44倍で瞳径2.3mmになります。
アイレリーフが19mmと長く眼鏡を使用した場合でもアイカップのゴムを折り曲げれば気持ちよく使用できるとともに、アイカップも柔らかく裸眼でも見やすいです。見かけ視野も60度で、構成は3群4枚でガラス非球面レンズも含まれており優秀な部類だと思います。
普及型の双眼鏡という量産品からの流用であり、更に、ジャンク品では格安となり1個1,000円程度で作成できるときもありコストパフォーマンスが良いです。当然、双眼鏡なので1台から2個のアイピースが取れます。光軸ズレなどの不良品で返却できないプロフィー
ルド双眼鏡があり、興味があれば是非自作を試して見て下さい。尚、31.7mmのスリーブは別途入手ください。重量も85gで扱いやすいです。2インチアイピースは一般に300g以上なので31.7mmアイピースに比べ重量や保管スペースで扱いづらいです。また、結果的に焦点位置がマイナス側(アイピースのスリーブ段差の対物レンズ側になる)に3mm程度余裕に
なったので、バックフォーカスが不足ぎみの厳しい機器でも合焦可能性が高くなります。
特に近眼の人で裸眼で見るときには重要です。自作で31.7mmスリーブをゴムなどの緩衝材をはめこんで固定しているだけなので注意して扱わないと分離して脱落しそうになる時があります。8×40や10×50の双眼鏡は焦点距離18mm相当のアイピース部分を用いているものが多いようです。
また、31.7mm規格アイピースで低倍率を用いるときはケンコーのPL25mmもよく使用します。
アイレンズがギリギリに浅い位置にあり、アイレリーフも長いことから眼鏡を使用した場合でも見やすいです。
焦点位置のチェックの時はアイピーススリーブ段差の位置にアイピースの焦点位置のあるケンコーのPL20mmをよく用います。PL25mmでは目視で焦点位置をつかむのに範囲が広く感じられ合焦の山の頂点を見つけづらくバラツクからです。特に私は近眼なので裸眼で長焦点アイピースで合わせるとズレが大ききなりがちです。
(4) 鏡筒が短いので鏡筒バンドとHF2経緯台のアームとの衝突を避けるために、鏡筒バンド固定つまみを内側とし、鏡筒径が小さくなったことから左右鏡筒バンドつまみが同位置でも重ならないことが可能になった。
かえってぶつからないように鏡筒間隔D=162mmに広げた。
(5) バランスウエイトは31.7mmアイピース使用時は手前側とし、2インチアイピース使用時は対物側に移動で前後バランスはとれる。31.7mmアイピースや2インチアイピースも重量が変わらないことから、必要バランスウエイト重量も同じとなる。
バランスウエイトの取り付け位置もSE-120鏡筒使用のときと同じく、アイピース交換時に操作しやすく、接眼部側を短縮できる手前側設置とした。対物側重量不足の万一のときのためにバランスウエイトシャフトは対物側にも伸ばしており、取り付け可能なようにしてある。
(6) EMSの上下方向の調節範囲に入らなかったので片側に0.5mm厚のワッシャーを入れて、調節範囲内とした。
(7) エクステンダーレンズに使用のステレオ顕微鏡用の補助対物レンズについて、入手した0.7Xのものを試したが、0.75Xと光学仕様はほとんど変わらないと思われるのに、SE-102の対物レンズとの相性が良くなかったせいかわからないが、倍率を上げていくとピン
ボケのような解像度の無い見え方が顕著に感じられ、SE-120鏡筒で使用した0.75Xの補助対物レンズをSE-102鏡筒でも使用することにした。入手した0.75Xの補助対物レンズ使用だと0.7Xに比べそれほど悪化が感じられない。
(8) ケンコーのSE-120L、SE-120、SE-102鏡筒 で双眼望遠鏡を作成してきて、アクロマートではあるが SE-120L がやはり好みではあるが、私には重く、長く扱いづらく感じられ、
どうしても使いたいと思うとき以外は使用しないことが多い。102mmのED双眼望遠鏡に比べ色収差により透明感やスッキリ感などは劣るが見え味はかなりいいとこまで迫っていると思うので、既存接眼部がそのまま使え、鏡筒のカット程度の工作で対応できるので、コストパフォーマンスも良く、重さや、長さをそれほど苦にしない人には良いと思います。
SE-120、SE-102鏡筒では接眼部を短いものに交換してバックフォーカスをEMS使用できるように長くするか、素人では手が出ない程度の接眼部の改造をしてバックフォーカスをEMS使用できるように長しなければならない。
簡易的にエクステンダーを追加してバックフォーカスを長くする方法があり、ステレオ顕微鏡用の補助対物レンズ0.75Xを用いて実現できることがわかった。ただし、倍率を上げたときに性能低下に簡単に気づく。
私の個人的な印象ではSE-120Lは200倍程度まで、SE-120は150倍程度まで、エクステンダー追加版は100倍程度までの運用範囲が良いのではないかと思います。
個人の好みや目的にもよりますが100倍程度まででも惑星などを除けばかなり楽しめると思います。これでも一般の大型プリズム双眼鏡よりは90度であることなど使いかってが良いことや見え味、2インチアイピースを含むアイピース交換による倍率変更、見かけ視野
変更などで勝っていると思います。
そのうちEDレンズなど使用の双眼望遠鏡にグレードアップしたくなれば作成する仕様範囲
にもよりますが現在使用の「EMS-ULセット+IPDヘリコイド」は転用・兼用使用できるの
でコストパフォーマンスは良いと思います。
(9) Amazon で使用できそうな安価な2インチ接眼部がありましたので参考に紹介します。
私が購入したときは1個5,360円でした。現在、在庫切れになっているようです。
これぐらの金額で使えそうな2インチ接眼部が入手でき、適合できれば、エクステンダーが1個2,000円ほどなのでエクステンダーを選択しなくてもよさそうですね。
全長137mmのドロチューブの先端を37mm程度切断加工して100mmに短くすればF4.9鏡筒でもギリギリ使用できそうな感じです。先端開口は55mm径です。尚、商品説明記述には誤り記述もあります。
SE-102で焦点位置をあてがって簡易に試してみたところIPDヘリコイドの最短から最長でドロチューブ繰り出し量23mm~7mmで無限遠合焦したので、ドロチューブのストロークが37mm切断したとして70mm-37mm=33mmであり適合しそうです。ただし接眼部は鏡筒内径より小さいので接眼部の取り付け方法、取り付け位置で少し変動します。鏡筒の切断は必要なしです。クレフォードの動作域での切断なのでネジ取り付けなどでのストッパーが必要に
なります。クレフォードでのストッパーの取り付けは経験がないので検討が必要です。
現在作成したSE-102双眼望遠鏡にこれを適用して更新改造することは今のところはまだ予定していませんが試してみるかもしれません。
(10) 蛇足ながらSE-120の双眼望遠鏡で使用した接眼部は笠井の蔵出品放出で1個8,000円で2個を以前に購入できたものを用いました。正規品だと高くて購入はしていなかったと思います。
エンビパイプを切ってスペーサーにして位置安定と遮光に使用しました。固定は鏡筒フランジにM4ネジを切って、接眼部の回転固定部分の溝を3本のM4ネジで押して行っています。
旋盤を扱える環境の人だと簡単にアルミでアダプターを作成するところでしょう。
(11) ほかに、80mmF7EDレンズ使用の双眼望遠鏡の作成は私の中で先に行いたいことが多く後回しになり遅れています。
80mmEDレンズはM89/P1.0内ネジで鏡筒にねじ込むレンズセル構造になっているのですが、旋盤の環境が無く、90mm径鏡筒外周に外ネジを作成できないので、エンビ継ぎ手を加工してレンズセルを取り付けて、この継ぎ手を介して90mm径鏡筒に接続しようと加工中です。
当初はSE-102の対物レンズ部分を外して、残りをまるごと鏡筒バンドなど含めて使用と思っていましたが止めて90mm外径鏡筒使用に変更しています。
(12) 私は実際に天体を見るのも楽しいですが、どちらかというといろいろな機器を持つのが楽しく感じられています。作成自体は面倒なのでそれぼど楽しく作業してるわけではありませんが、それなりには楽しめています。できるだけお金をかけないようにコストを抑えるために自作で作成しているものが多くなっています。当然、欲しい状態の品で完成品で販売しているものは、完成度が高く、手間も省けるので完成品で購入しています。私の自作品は完成品には及ばないレベルであり、外観など完成品に近づけようとも思っていません。機能が果されれば十分満足です。結果的にトータルで結構な出費となってしまいました。
もう、私と同じ年代の年寄りは終活を考えたり実施している人も多いと思います。私の場合、機器が多くなってきているで終活だけでなく、そのうち整理が大変になることは予想していますが着手は当分先の気持です。
だらだらと私的感想を含めて長文になってしまったことご容赦ください。

The due shield thread of APM-70 is P-1.0, while 77mm filter is P-0.75, and most of us including myself must have abandoned to set 77mm filters directly on it.
It is the happy surprise that the margin of the thread accepted the 77mm filter.
77mmフィルターのネジピッチは0.75mmで、事前に確認したAPM70双眼鏡のフォード先端ネジは77mmのピッチ1.0。 「あなたは天文マニアか?」と設計者に腹立たしい思いでいましたが、試してみるもの。元ネジの余裕から、p=0.75のフィルター枠もちゃんとねじ込めました。アダプターを作るつもりだったので、拍子抜けしています。^^

10X70, just as the hand-held Binocular.
Perfectly free from distortions and overwhelming clarity.
LAVENDURA-40mm を試してみました。
まさに手持ち双眼鏡の倍率とディストーションフリーの圧倒的に抜けの良い視野。圧巻です。 私個人的には、MASUYAMA32mmの圧倒的な広視界に一押ししますが、これも捨てがたい選択肢だと思いました。なにせ、10X70ですから。


12.5X70 Right Angle Binocular is achieved!
圧倒的な広視界と覗きやすさです。
特殊アダプター(外被せ方式)により、元の85度はさほど制限された印象はありません。(推定70度くらい)


Customized for the smaller IPD of 57mm (normal=60mm)
小目幅加工(57mm)を施しています。
Extra-Large-EMS for 24cm and 30 cm (D=300&400) Binoscopes is completed!
24cmBINOと30cmBINOを同時運用し、EMSは1組を共用されたいとのご希望に対応した仕様になっています。30cm用の延長チューブの挿入に際し、接続角度の再現性が維持されるように配慮しました。

EMS-ULS SET for BORG-125ED-BINO is completed.
125ED-BINO用のEMS-ULSセットが完成しました。
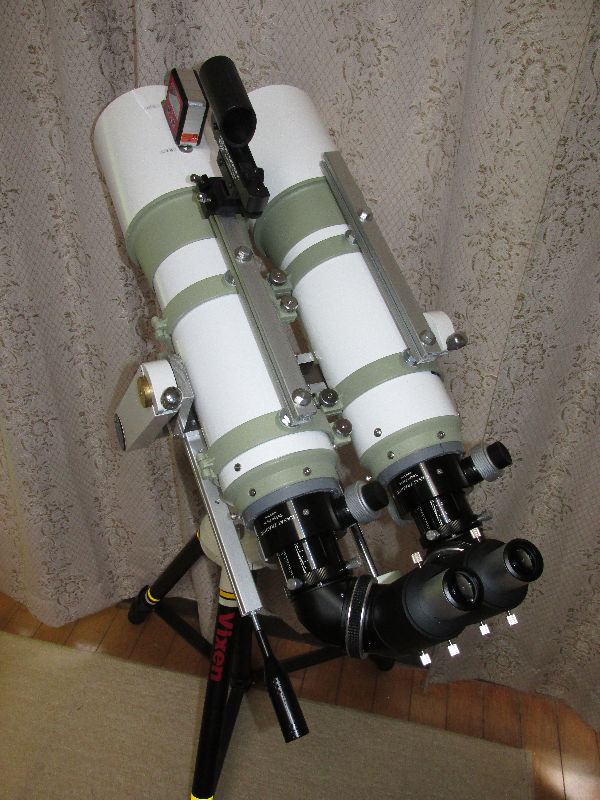


「EMS-ULセット+IPDヘリコイド」とケンコーのSE-120鏡筒で自作の双眼望遠鏡を作成しましたので紹介の写真を送付します。
SE-120鏡筒の仕様のF5(焦点距離600mm)のままで既設接眼部をEMSでケラレなく使用できるようにする方法が見つからなかったので、入手して持っていたドロチューブの短い接眼部に交換しました。それでも120mmが117mm程度に若干ケラレましたが、程度が軽いので良しとしています。
F5の短焦点のアクロマートでもあり、収差を好まない人もいると思いますが、それなりには見えて実用範囲と思います。なんしろSE-120L鏡筒使用に比べ鏡筒が短いので、扱いやすいです。HF2経緯台にのせる双眼望遠鏡ユニットとしては12.5kgの重量になりました。
EMSやバランスウエイトをとりはずさ無くても、私ひとりでHF2経緯台に載せたり降ろしたりできるレベルの重量です。取り外せば時間はかかりますが更に容易となります。
天体の導入支援補助としてはタブレットなどの星座アプリで目標天体のその時の方位と高度情報を入手して方位環とデジタル傾斜計を用いて導入します。1度以内程度の誤差範囲で導入できてそうな感じで便利です。もちろん等倍目視LEDドットファインダーで直接導入できる人はそのほうが速いです。この程度の双眼望遠鏡では倍率のある光学ファインダーは口径50mmのものでは重量が500g程度あり、バランス調整の面倒さもあり必要ないと思います。
以下、詳細について追加説明します。
(1) SE-120鏡筒のバックフォーカスは127mmで既設接眼部のドロチューブ長さが158mmで先端開口が52mm径で「EMS-ULセット+IPDヘリコイド」の光路長を確保しようとして鏡筒をカットすると大きく対物レンズ口径がケラレることになる。入手していた接眼部はドロチューブ長さが97mmで先端開口が51mm径でケラレが若干でおさまるものであり、これに交換して使用することにした。
(2) ケラレを少なくするために鏡筒間隔D=154mmとした。最大眼幅は制限されるが、私の眼幅の66mmは範囲内にあり70mm程度までは対応できるみたい。
アイピースのスリーブの段差の位置にアイピースの焦点位置のあるアイピースを用いる通常の無限遠合焦はドロチューブを25mm程度引出した位置であり、この位置で120mmが117mm
程度に若干ケラレるものになった。測定方法が正しいかは判らないが、接眼部のアイピース焦点位置にレンズを外した安価な1灯LED懐中電灯のLED部分をセットして点光源とし扱い対物レンズ側に紙を置き投影して透けた光円で計ってみた。
尚、鏡筒のカットは行っていません。
(3) 鏡筒が短いので鏡筒バンドとHF2経緯台のアームとの衝突を避けるために、鏡筒バンド固定つまみを内側とし、左右鏡筒バンドつまみが重ならないように位置を前後にずらした。
(4) バランスウエイトは31.7mmアイピース使用時は手前側とし、2インチアイピース使用時は対物側に移動で前後バランスはとれる。
(5) 交換した接眼部の取り付け誤差もあり、EMSの上下方向の調節範囲に入らなかったので片側に0.5mm厚のワッシャーを入れて、調節範囲内としました。
(6) 接眼部を交換したのでその分コストアップになってしまいました。大きさによる扱いやすさや、低倍率になりずらさをいとわなければ、先に紹介したSE-120Lのほうが見えが良いと感じますがSE-120では扱いやすさは格段に良くなり、ちょい見には使用頻度は多くなります。重量や大きさは物理寸法からはそれほど差が大きくはありませんが、私にとってはこのあたりに一つの壁があるように感じます。
蛇足ですが、光学性能に満足できない人はEDレンズなど使用の高価格品を使用するしかないと思います。特に高倍率になっても鮮明な像となることを望む人はEDレンズなど使用品を使用がストレスが少なくて良いと思います。
Comment by Matsumoto / 管理者のコメント;
東京のYNさんより、また自作双眼望遠鏡(EMS-ULセット使用)のリポートをいただきました。
20年前くらいと比べると、自作マニアの方の数が減って来た印象がございます。 その中でも、こうして果敢に自作に挑戦さえているご様子を拝見し、頼もしく思いました。
今回も鏡筒のバックフォーカスの確保に腐心されたようですが、市販鏡筒の実情、30年前と少しも変わっていませんね。
方位メモリを水平回転軸に設けられ、デジタル傾斜計を鏡筒にセットしておっれる写真に注目しました。SkySafari等の天文アプリと連携すれば、強力な導入支援が實現しますね。
YNさん、今回も素晴らしいユーザーリポートをありがとうございました。